How to Install an Exterior Residential Door on Your Home
-
How to Install an Exterior Door - Door Installation Instruction
-
The Window Connection proudly presents:
Best Practices for DIY (do it yourselfers!)
-
How to Install a Residential Pre-Hung Exterior Door
-
DallasWindows.com
-
-
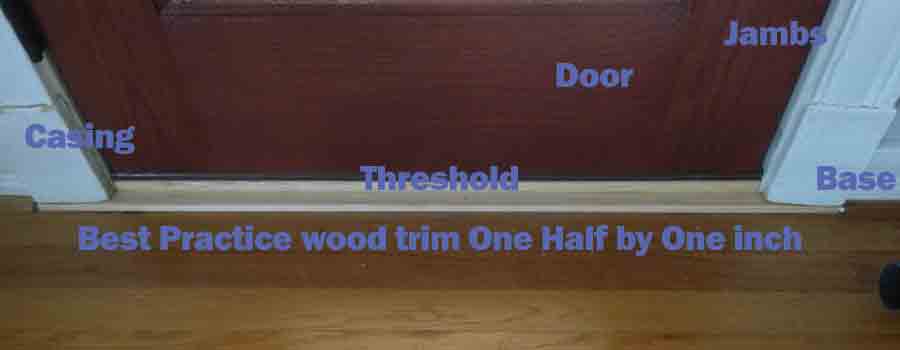
When replacing an exterior door, the interior trim (also called casing) is often cut for the previous door at a height that may be shorter than the modern doors we see today. In this case the casing was period sensitive and needed to be reused but was about 1/2" short. Older doors are often 81 inches tall with jambs and threshold but new ones are 81 1/2" tall. Also in installation we often need trim at the bottom to seal or cover irregularities and most carpenters will use a quarter round or a cove moulding to make the bottom presentable.
This best practice tip is to trim the bottom from both ends of the base BEFORE the casing goes up. Here we see a small one inch by half inch piece of select pine with a light sanding on the edge placed against the new door, running from both sides of the base completely under the casing. This gives the casing the extra height we need while covering the bottom edge of the door.
Thats your door installation tip of the day!

How to Install An Exterior Door
By David R. TraynorWe’ll be installing a pre-hung door unit. Your replacement door should be the same size, jamb thickness, and hinging of the existing door. Tools necessary are listed on the tools page of the website. We will attempt to do this door reusing as much of the existing wood as possible for cost reasons. If you desire to re work all wood in the area. Adapt these instructions accordingly.
Prepare the new door by laying it on the ground, hinges up, and taking a few minutes to verify that its well built, square, and ready for install. Remove all shipping blocks and cardboard or shrink-wrap. Verify width of unit, height of unit, hinging of unit, jamb thickness and construction of the door itself. This is very important, as this unit must be correct before there is a large opening in the house without a door.
CHECKING THE REVEALS:
Ideally the door will have a 3/32” reveal between the slab and the doorjamb all the way around the door when the door is laid on the ground and squared corner to corner. This gap may seem tighter on the hinge side, but the real issue is that the door reveal is equal on the strike side, and that the top reveal looks straight while sealing properly at the threshold. The Threshold may be adjustable so a gap that is apparent may be adjusted up to seal. Either way we want to know that the door will have equal gaps on all reveals once its stood in the opening. If the unit is good you are ready to move forward.
- Remove existing door casing. That is the trim on the inside of the door that runs from the sheetrock wall to the old doorjamb. Begin by cutting the sealant at the wall line with a utility knife. Then cut the trim loose from the jamb. Cutting is important as we do not want to disturb the sheetrock wall or have painting concerns.
- We’ll gently slide a three-inch stiff flat knife between the casing and the doorjamb, and pry outward. Use the small pry bar and gently work the casing loose from top to bottom, moving it just an eighth inch at a time for the full length of the trim. We want to remove this casing in one piece if possible as it can be reused. All three pieces of interior casing must be removed.
- The old casing should have nails removed for reinstallation. This is done by using wire cutters and pulling the nails out from the back of the trim. This prevents nail holes from being exposed.
- Remove the door itself from the frame by either removing the hinge pins or unscrewing the hinges themselves. The Door can be removed from the work area after alarm sensor has been removed and doorknob and deadbolt have been removed.
- Our first cut will be with a sawzall and will be a horizontal cut, through the jamb of the door. It should be about 40 inches up from the bottom of the door and run the full width of the jamb itself. The jamb is probably 4 9/16” thick, but see measure tips for more information on sizing.
- Some doors will require cutting the jamb loose from the threshold by making a similar cut at the very bottom of the doorjamb. This applies to doors with attached sills. Our goal is to remove the jamb while leaving the exterior trim in place.
- Use the flat knife to separate the jamb from the exterior wood casing. Gently hammer the knife in-between the wood and the jamb and pry until you have a gap of 1/8” or so. This is a slot wide enough to get your sawzall blade into the slot to cut loose exterior nails. Make the cut. Our goal here is simply to cut the nails but some sawdust will be apparent and is normal for this step. We are cutting the jamb loose from the exterior wood. Because the jamb is being replaced it can be damaged more so than should the exterior wood. This should be left in place when possible for ease of alignment.
- This should loosen the Jamb enough to remove it completely. Insert a large pry bar between the stud of the opening and the jamb, pry as necessary to loosen jamb. Use a hammer as necessary. Be cautious not to damage the wood that is not being replaced on the exterior. Also. Watch carefully for the alarm contact wire. These are usually dropped in from the top and consist of two wires. When you cut these loose leave enough wire to re-splice the contact back together on the new door unit.
- Prepare the new door unit. Make sure all shipping wood is removed from the bottom of the door and check to see if the door is secured for shipping with nails or screws. These need to be removed. The door should be able to open, but leave it closed as you move it to the work area.
- Make sure the bottom area is clean. The sill must be free of obstructions and sealants. Ideally the sill will sit directly on the slab or foundation of the home, or, on top of the wood sill. Also, clean out the opening. Insulation, nails that are protruding, and sealants should be scraped off and removed to provide a clean opening.
- We’re ready to set the door at this point. Gently place the door in the opening. Be careful that you are not finding any obstructions.
- The door will be mounted with six 3” long fully threaded sheet metal screws run horizontally through the vertical jambs (three on each side). A 3/8” paddle bit is used to drill the mounting holes. Mounting holes should be 1 ½” from the corners of the jamb directly in the center of the exterior part of the jamb. They are on the vertical sections of the jamb itself. They are 3/8” deep. The function of the holes is simply to make sure the screw heads seat below the surface of the jamb.
Quick Tip 1
In all instances screws will run better, straighter and more accurately in general if predrilled. Every time you see a reference to installing a screw, it is preferable to pre-drill a hole, using a drill bit somewhat smaller than the diameter of the screw itself. An 1/8” or 9/64” drill bit works quite nicely to run pilot holes for # 8 or # 10 screws. The screws in a doorknobs backset or strike plate would require a smaller pilot hole (7/64” or 1/16”). Although not mentioned specifically at each step, we always recommend pre-drilling. It makes the screws install easier, and makes them easier to remove if necessary for adjustment or re-alignment.
Quick Tip 2
If a screw begins to strip out, that is, the tip of the screw gun slides off of the screw, remove the screw and discard it. A screw that is stripped is a major hindrance to our install and will not make our project go smoothly. The screws are relatively inexpensive but lost time due to a stripped screw that must be removed is always costly (in time if nothing else).
- Center the door in the opening at the bottom. Use the interior paint line or the existing base trim as your gauge. You will also need to be sure that the new jamb is flush with the sheetrock on the inside. Any gaps that are created will be sealed and filled with caulking so variations that are minor are dealt with at that stage. Interior casing is 2 ¼” thick so our door should mount in a way to accommodate this trim again. Mount bottom screws through the thickest part of the exterior part of the jamb in the center of that wood that is exposed when the door is closed about 4 inches from the bottom. It is often necessary for someone to hold the door up and in place in order to perform the mounting process.
- Center the door at the top between the paint lines and install the mounting screws on top in a similar location on the jamb but about 4 inches from the top. The door may not work properly at this stage so be careful to examine the reveals and the square-ness of the unit before opening it or closing it.
- With the 4 screws mounted you should stand back and examine the square-ness of the unit. Also, verify that we are lined up with the vertical paint lines on the interior of the home. These lines are crucial. Vertical lines must look straight and must look good and cover to the old paint lines. Hold the casing up to the door and make sure it covers all the old paint lines on the sides. If all these line up properly then move forward.
Top Reveal
- When the door is closed, examine the top reveal to see if it appears straight with the door slab. One side or the other may need to come up. It is important to move the side jamb vertically to correct this reveal issue. A drywall screw run up through the top jamb (center the screw on the outside part of the top jamb, at 1 ½” from the corner of the door). This will secure the door while you remove the other two mounting screws. Utilize shims under the door, and the sheetrock screw to move the jamb up as necessary to correct the reveal problem. Making the top line appear straight with the door slab is very important.
Vertical Reveal (Twisting of opening)
- The next reveal to check involves how the door lines up vertically with the jamb itself. Open the door and hold it slightly open and examine if the door and the jambs line up. A good point of reference is the weather-stripping. The Door must hit the weather-strip from top to bottom at the same pressure. This reveal addresses that issue. This is described as “zero to eighth inch” or “zero to quarter inch”. These descriptive phrases describe the twisting of the opening. Twisted openings are common in today’s homes. This is the main reason doors should be hung according to what is aesthetically pleasing and functional not what is plumb, or level.
- The jamb must line up with the door slab as it closes. “Floating” the jamb in and out as necessary to fix this reveal does this. We are looking for a “zero to zero” reveal (that is. straight up and down as we look at the door and its relationship to the jamb. If it’s a major discrepancy you may need to float more than one corner. Remove the mounting screw and push the jamb towards the inside of the home to fix the problem. Try to make this adjustment be not more than 1/8” per corner. In practice, one-eighth inch on 4 corners will allow for one half inch of twisting in an opening. This twisting must be addressed before moving to the next step.
- At this point we want to recheck all reveals.
Verify Side Reveals
- Sometimes a hinge screw is necessary through the top hinge to pull the door up and correct sagging issues (evident by unequal lines from top to bottom between the door slab and the jamb itself on the strike side). Find a happy medium between steps 16 and 20. The hinge screw will increase the reveal between the slab and the strike side of the jamb, while moving the doorknob side of the slab “up”. This will change the top reveal mentioned in step 16. Looking for a consistent gap between the door slab and the jambs is very important to correct operation of the door unit. Hinge screws may also be utilized in other hinges as necessary to move the door within the frame. Remember not to over tighten screws. Shanked screws will pull harder than fully threaded screws. Fully threaded screws can actually be used to hold a piece of wood out and away from another piece of wood. This may be helpful to know when picking the correct fastener for the job.
- Once we’re happy with all reveals (top, sides, and weather-strip reveal), we are ready to install the last two mounting screws through the side jambs. These are in the middle of the vertical jambs of the door (centered in the exposed exterior of the jamb). Hold the jamb in place to assure the reveal is correct at the sides (to assure the knob works properly). Also make sure that you don’t see any bowing in the hinge side of the jamb. If bowing is evident install shims as necessary to make the hinge side jamb appear straight and without bows.
- Use shims to firm up the mounting areas of the door in a minimum of three places on each side of the door. Put the shims in tightly and make sure that they are secured in place by the mounting screws. They can be lightly tacked with a small finish nail if necessary, but the overall tightness of the shim against the jamb and the stud should hold it in place. The screws should be tightly run and the door should feel stout when pulled up or down. The shims will need to be cut back to flush with the walls. This is done using the utility knife, and gently cutting through the shim at a slight angle. Make the cut towards the door not away from the door. If the knife gets away from you it is easier to cover an error on the door (which will need to be painted) as opposed to wall damage. Ultimately our goal is to not have to paint or do patch work on the wall itself. The door, trim and jambs will need to be painted after the install.
- Door Knob and deadbolt are installed at this point. The strike plates will need to be mortised into the side jambs. Mount the strike plate for the doorknob first using two screws and verify that the door latches and operates properly. Many doors are pre-mortised for the entry knob strike plate. If it is not mortised, it should be at least drilled with a 1” hole for reference. Mount the plate; verify that the plate is positioned correctly by closing the door and checking operation of the door. Check operation of the deadbolt. Adjust the plate as necessary to make sure the door latches, locks, seals, and that the deadbolt will throw correctly. If necessary, mortise the strike plate in the following manner. Use a utility knife to cut carefully around the plate and remove the screws and plate from the jamb. Using a sharp wood chisel, tap lightly on the end of the chisel to cut a line where the wood must be removed (i.e. the utility knife cut line). Then use the chisel to remove one sixteenth of an inch of wood from the surface of the jamb where the strike plate will be installed. This is a very important step cosmetically. Make sure not to damage the wood that is not covered by the strike plate. Reinstall the plate and verify that the door latches and locks properly. This step may need to be repeated for the deadbolt strike plate.
- If it is necessary to drill for the deadbolt hole as well as mortise, make sure the knob strike plate is positioned well for door operation. Open the door and throw the deadbolt out fully. Use lipstick, model paint, or touchup paint to paint the end of the deadbolt’s throw mechanism. Return the deadbolt to the unlocked position and close the door firmly as you expect it to close under normal conditions. Turn the deadbolt to lock it and allow the end of the deadbolt to mark the jamb for your throw hole. This hole is drilled using a 1” paddle bit.
- Shims may be necessary under the threshold in order to reduce movement. Shim evenly in no fewer than 5 places along the threshold area. Remember to use the shims as male and female pieces (that is, one runs in from the inside and one runs in from the outside) as this keeps them flat as opposed to angled. The threshold must not move when stepped on. The shims will prevent it from sagging, but three to five careful placed screws may be necessary to secure the threshold. Measure for these if they are exposed to assure aesthetics. They should be in the center of the threshold, one in the center, two on the ends at 1 ½” from the edge of the threshold, and (if necessary) two others to be centered between the end screws and the center screw. A 2 ½” #8 or #10 sheet metal screw will work quite well here.
- Doors with adjustable thresholds can often have the threshold mounting screws underneath the adjustable threshold. This is done by removing the adjustable threshold and running the three to five screws in the area that is covered by the adjustable threshold. Care should be taken to place these screws in a place that does not hinder the adjustability of the threshold. Verify that the door threshold is solid and can be walked on by persons of all weights. Anything “spongy” is not acceptable. Sometimes thresholds will need to be mounted using anchors and screws, in holes that are drilled using a masonry bit. This is often done utilizing a hammer drill when drilling into a homes foundation. An easy way to do this is to drill a 3/16” hole through the threshold into the ground.
- Your door should be mounted and operating correctly at this stage. If not, make sure to back as necessary to correct the problem. If all is working and looking well, you can insulate. Fiberglass insulation is best. Soft spray-in foam is also acceptable but “Great Stuff” is not. Many manufacturers will void your warrantee if you use a spray in a foam product that doesn’t remain soft. Many spray in foam insulators expand greatly and dry very rigidly. This is not good for doors as it can bow jambs and cause the door to be tighter than the manufacturer designed it to be. Lightly packed fiberglass insulation such as an R-14 Owens-Corning Fiberglass insulation is ideal.
- At this point, we are ready for interior casing. Cut the new casing in a manner that will cover all old paint lines, cutting the top first. It will be cut in a manner similar to the one removed (i.e. 45 degree angles on each end). If reusing old casing, a cut is usually unnecessary. The top piece being first, center and nail it carefully using 5 nails equally spaced and nailed through the casing and into the door jamb itself. Do not nail to the wall at this time. The casing will sit about three-eights of an inch up from the edge of the doorjamb. Verify that this will cover the sheetrock up to the old paint line on top. Also, verify that the corners of the casing will work out on the sides as to covering the old paint line. A 36” prehung door will usually have casing that is 36 ¾” inside corner to inside corner. Using 2 ¼” casing, that casing will measure 41 ¼” outside corner to outside corner. This is “generally” accurate but should be verified on-site. Nails used should be 1 ¼” long finish nails. Do not run them closer than 5/16” from the edge of the casing as it could split.
Quick Tip 3
The next few steps are your last chance to make small adjustments on your interior jamb reveals. If they are not perfect you can use your 3” flat knife to gently pry between the door slab and the jamb and move the wood around slightly before you nail. Several places mention not nailing to the wall itself. This is to make sure you have this adjustability for last minute adjustments. Once the trim is on our reveals cannot be moved so we need to be sure the door is operating well and the lines look straight overall before we run every nail. If you aren’t happy with the top reveal, after the trim is nailed to the top of the doorjamb, gently pry the jamb up on the lower end until it is straight and nail into the wall using a 2” or 2 ½” finish nail. This allows the wood trim itself to help you straighten out slightly misaligned reveals.- Measure the height of the sidepieces from the slab to the top corners of the mounted top piece of casing. Cut these pieces. Set them in place and verify that they will work and not be interfered with by the base trim at the bottom of the wall. Sometimes it will be necessary to remove the base and cut it back in order to accommodate the new casing. If removal of the base is difficult, it can also be cut back by setting the casing in place over the existing base and scribing a straight line with a utility knife into the surface of the base molding.
- Either make the cut with the knife or utilize a sharp wood chisel and a hammer. When using the chisel, you will place it on the scribed line and gently tap it with the hammer. As you get into the surface of the wood you can shave the wood up to the cut from the end of the base. This slowly shaves material away and allows clearance to make the next scribes with the chisel. This step may need to be repeated several times in order to completely remove the unwanted section of base. Be careful that the sheetrock is not being damaged as you perform this step.
- When mounting the casing start at the top to make sure the miter is attractive and work your way down the sides. Place a nail at 3 to 4 inches from the end of the casing, through the casing and into the doorjamb. There should be six to eight nails used on each sidepiece of casing. The side piece is about 83 ½” long, the nails are to be placed about 8 to 10 inches apart and no closer to the end than three inches (this prevents splitting). Be sure to run the nails straight into the jamb so as not to accidentally have the nail come through the jamb and impede the operation of the door. The nail should be no closer to the edge of the casing than 3/16”. Be aware of the edge of the jamb as you run your nails, some degree of angle may be helpful in attaching the casing, but be sure the nail is running into the jamb and not splitting out through an exposed area. Be sure to hold the reveal between the jamb edge and the casing edge straight and consistent from top to bottom as you nail. Once again, nail to the doorjamb and not the wall. Once the trim is secured to the jamb you can make minor adjustments to interior reveals on the side by using the same method used on the top reveal. Gently pushing the trim and the jamb toward the door or using the flat knife to gently pry the jamb away from the door is a great way to fine-tune all your reveals. Use the larger nail to mount the casing to the wall once your jambs and trim are in the perfect place aesthetically.
- Carefully run a nail into each corner miter. Use shims if necessary behind the casing to make sure the miters look perfect. If a nail was utilized to correct a reveal problem, it may be necessary to put the flat knife between the trim and the wall and move it outwards to make the miter look appropriate. This will not affect the reveals to any great degree if done gently and carefully. A gap between the wall and the jamb is not a problem, as this edge must be sealed with caulking as our final pre-painting step. Some variation between the wall and the trim is inevitable as home are not perfect and do move around after being built. They also can move somewhat seasonally and due to dryness or excessive wetness around the foundation.
- The bottom of the door may require an interior piece of trim. Usually, three quarter inch quarter round works quite nicely. Cut it to fit between the two pieces of casing and install it using small finish nails through the trim and into the door threshold itself. Gluing the trim is necessary in some cases if the door has an aluminum threshold. You can sometimes nail directly into the shims that support the threshold. Tile floors are best re-grouted when a gap is evident, but the wood trim is an excellent option if grout is unavailable or inappropriate.
- Use the longer finish nails to secure the outside trim that was left in place to the doorjambs. Five to Seven nails per side and three on the top is quite sufficient. Nail carefully so as not to allow nails to break through to the exposed areas of the doorjamb. Small nails to attach the corner miters run from the side into the meat of the wood will help to hold the miters properly. Sometimes the casing will not be directly against the sheetrock in order to make the door line up properly.
- The door is essentially finished at this point aside from putty in the nails holes, and caulking on the edges. Interior caulking is primarily cosmetic but the exterior is very important. Use a paintable caulking. Use a clear caulking on the bottom so as not to make a mess. Clear Silicones are most appropriate on the bottom as they are the most durable. Acrylic Latex’s with silicone are fine for the areas that need caulking where both edges to be caulked are paintable.
- Allow your sealants to dry for 24 hours and you’re ready to paint. Check with a paint professional to get the best paint for your area and your budget. Paint all wood surfaces, trims, and the door slab itself. Do not paint weather-stripping, hinges, thresholds, bottom trim on the door slab, or strike plates.
Enjoy your new door……It’s a professional installation……aren’t you proud?
I hope you found this helpful and insightful. If you did please find us on a social media outlet and give us a review for our knowledge and expertise on the subject! Thanks ~ Dave
French Doors Storm Doors Sliding Doors Entry Systems
Email us today or call for a free phone consultation.

(972) 951.6120
Call us and let us help you find the right products for your home!